 The
already existing connectors to the battery are 1 (ground) and 2 (plus).
New connectors are 3 and 4 for the NTC. Its important, that one end of
the NTC is connected with battery ground.
The
already existing connectors to the battery are 1 (ground) and 2 (plus).
New connectors are 3 and 4 for the NTC. Its important, that one end of
the NTC is connected with battery ground.This is only a brief translation of my article in Newton Lifestyle
But it is long enough to explain you all the steps needed for modifying your Newton to work with rechargeables (batteries)
If you don't know what a NTC is, what current is or where the hot side of your soldering-iron is: Hands off! Ask a friend, or buy a original battery pack. Any damages done are your sole responsibility, not mine.
You need a MP2000 or MP2100. All other models will not work.
Dont try other adaptors than the original ones from APPLE. Part of the carching logic is in the power adaptor. If you really are in electronics, see the documentation of the interconnect to see the requirements of a power adaptor.
 The
already existing connectors to the battery are 1 (ground) and 2 (plus).
New connectors are 3 and 4 for the NTC. Its important, that one end of
the NTC is connected with battery ground.
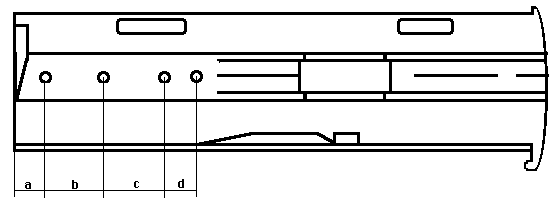
The drawing shows the buttom view of the battery holder.

dimensions a: 8mm, b: 10mm, c: 12mm, d: 8mm
Drill 1mm holes at the 4 places marked. The holes are all on the center line. For your orientation, you can use the in injection channels. The holes pass through at the top level of the bar (that is between the batteries) on the reverse.
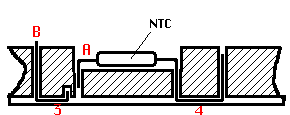
 Cross section, showing position of holes on the center line.
After having drilled the 4 holes, grind off part of the bar between the inner two holes. You will place the NTC there. Take care to grind off enough, so that the batteries have enough place. Check this by placing the NTC into the recess and seating the batteries.
 "Ausfräsung im Steg" = recess in bar. Longitudinal section showing recess.
Now place the NTC into the recess. push the leads through the holes, bed them, and push them back upwards trough the outer holes. ATTENTION: The lead of contact 4 may not pass completely throug the bar, or you will have contcat with the battery that may cause a short circuit. Do not cut the outer lead, this will be connected to the battery. Fix the NTC with some glue.
 "Zum Akku, Masse" = to battery, ground. Placement of NTC and leads.
Now you can place the batteries. The ground side of the battery with soldering strips is connected with the NTC (contact 3 and 1). Use some isolated wire. Now you are ready to check you work.

Switch off your newton
Place the battery pack into your Newton, plug in the poweradaptor. Start Nick's BattMon. You should read "batteryType nimh". If not, check all your wirering. Both values "batteryTemp" and "ambientTemp" should be more or less the same. If not, recheck the NTC-resistance. It should be 10kOhms. If you made a good job, you should now read "chargeState: quickCharging" or "chargeState: preliminaryCharge" and "chargeCurrent:" about 500 mA or 1200 mA .
This solution has one big drawback. You can't remove the batteries. So I came to a really sofisticated solution that enables you to remove the batteries. Read on!
This solution adresses three problems
This way, the Newton "sees" either a NiHM- battery or a alkalene battery.
Here is a modified diagram that shows the modification:

Now the battery works as the switch. To achieve this, peel off 17mm of lower part of the isolation of the battery. The opposide part of the contact and switch are two short strips of self adhessive copper strips. These strips can be obtained with electricaly conducting adhessive (used for shielding) Look at the photos, they should explain all!
To make it easier for you to understand wich connections go where, equal places/connectors are named the same in the diagram, the drawing and the photo.
Note, that there is a modification in how the wires are passed through the holes. The connection between 3 and A only exists in the basic solution!

The modified battery compartment. It didn't get better by all my experiments ;-(( "zu 4" = to 4
In the picture you see:
Advantages of this solution:
To make the solution even better, dont use the leads as contact,
but small strips of copper or brass that you melt into the battery
holder.
 |
homepage ©1999 by Nick Müller |